Thursday, November 7, 2019

Database First Approach using Entity Framework In ADO.NET


Database First Approach:

Database first approach creates the Entity Framework from an existing database. It creates model codes from the database.

First Create new project in Visual studio 2019

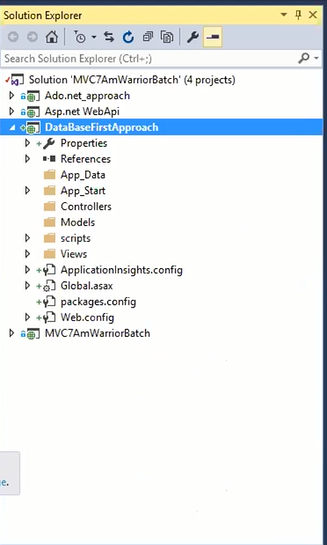
    1.  Right Click on Solution Explore -> Add -> New Projects -> Select Asp.Net Web Application(.Net Framework) using C# code ->Next ->Project Name(DatabaseFirstApproach) ->Create

    2. Select a template -> Empty -> Check MVC -> Ok.

Project is created with MVC folder.


Now, you must add Entity Framework into your project so,

   1.  Right click on Models folder -> Add -> New Item -> Visual C# -> Data -> ADO.NET Entity data Model -> Name(EmployeeModel) -> Add


2.  Entity Data Model Wizard dialog.

Select EF Designer from the database -> Next -> New Connection


Enter your Server name-> Choose your authentication. I am using SQL Server authentication. Thus, we need to provide the user name and password-> Select your database-> Test Connection-> OK.


It includes the sensitive data in the connection string->next->Choose version of Entity Framework.


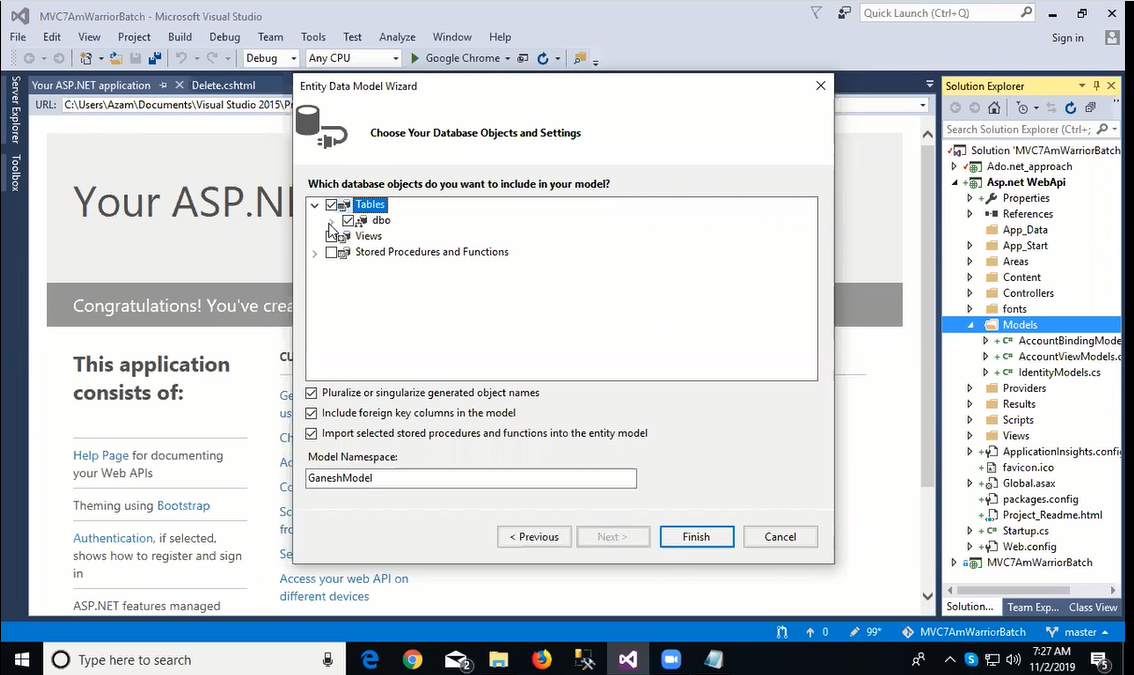
Include database objects to your model like below -> Finish.


Visual Studio will generate a database diagram for the table like below.


Incase you want to select more tablesthen right click on above page(EmployeeModel.edmx [diagram]) -> Update Model from Database.

Now, you have an Entity Data Model files in your Model folder with all supported files. The screen given above diagram, its shows the auto generated entities files like EmployeeModel.Context.cs. 

EmployeeModel.Context.cs in this class DbContext and DbSet are the ones that we need to establish a link between the model and database.

EmployeeModel.cs class is one where you will see all the properties.

Now Build the application then add controller in Controller folder.

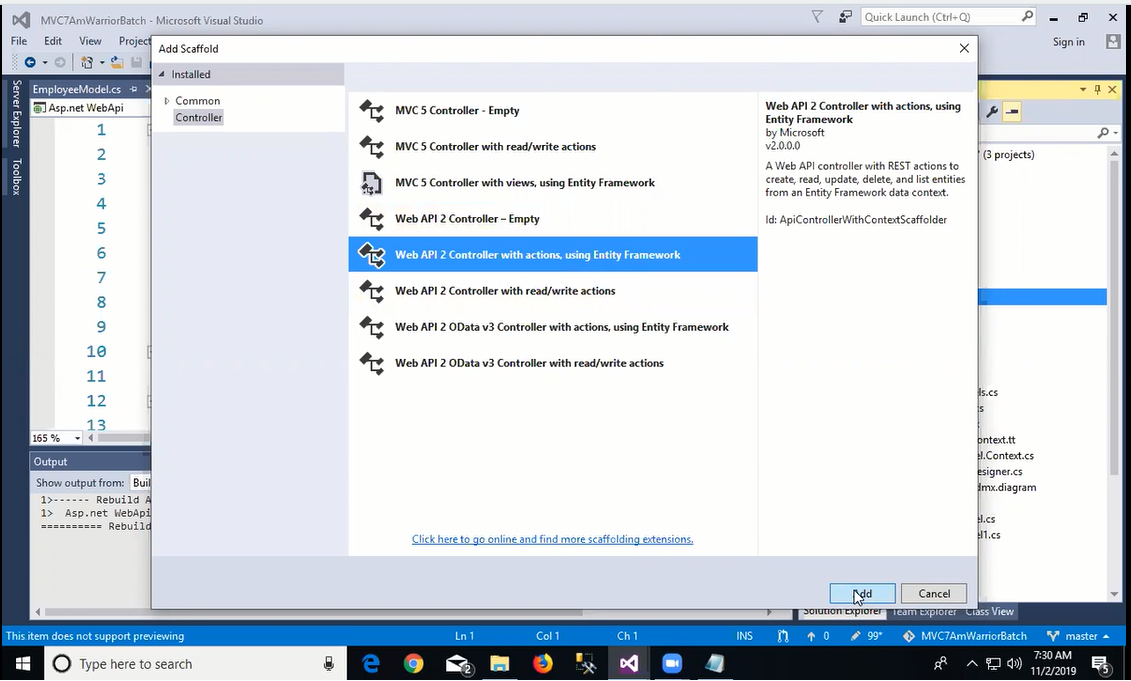
Right Click on Controller folder -> Add ->Controller -> MVC5 Controller with views, using Entity Framework -> Add 


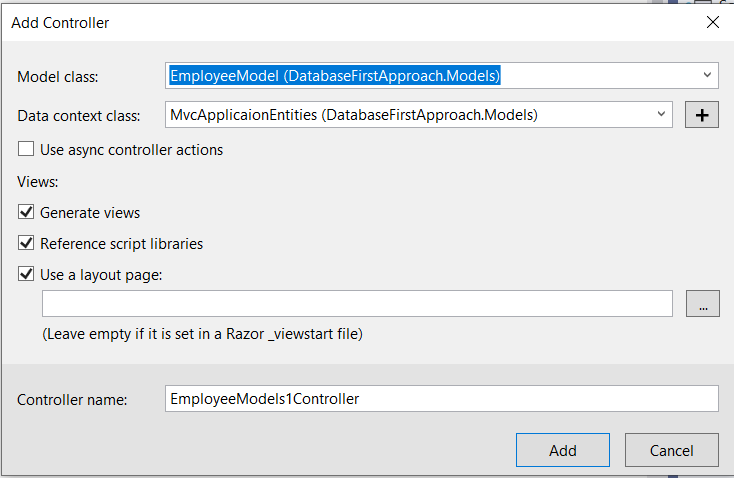
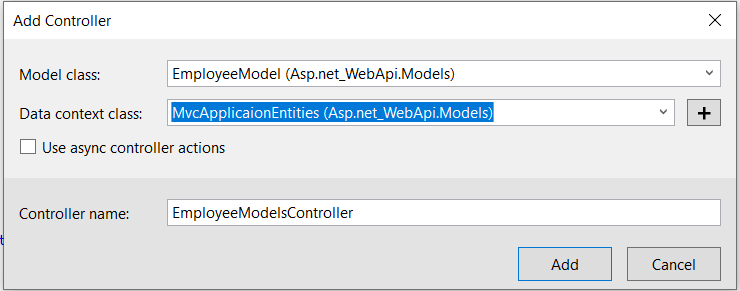
Now, display Add Controller template like below


when you select the model class and Data context class and check all checkboxes under views and click add.

Its automatically added all curd operations in controller and added all views like create, Delete, Details, Edit and Index.


Sunday, November 3, 2019

Creating Entity Framework in ASP.NET Web API, Create Get and Create methods through AJAX code


PostAjax :

The ASP.NET web API is a framwwork that makes it easy to build HTTP services that reach a broad range of clients, including browsers and mobile devices.

The ASP.NET Web API is an ideal platform for building Restful applications on the .NET Framework. Referred from “Microscft.com”.

Why to use the Web API

Currently most mobile devices, browsers and tablets are the medium for accessing most of the internet and in this also people are using mobile apps the most and to provide data to apps we are now going to use the Microsoft Web API

When to use it

If you want to expose the data/information of your application to your clients and other people then that other people can use your data and interact with the data/information can use this Web API

For example, a mobile application requires a service.
HTML 5 requires a service.
Desktop PC and tablets require services.
Currently most device apps require Web API services.

The ASP.NET Framework leverages both web standards such as HTTP, JSON and XML and it provides a simple way to build and expose REST based data services.

Some core concepts of ASP.NET MVC are similar to the Web API such as routing and controllers.

Create ASP.NET Web API:

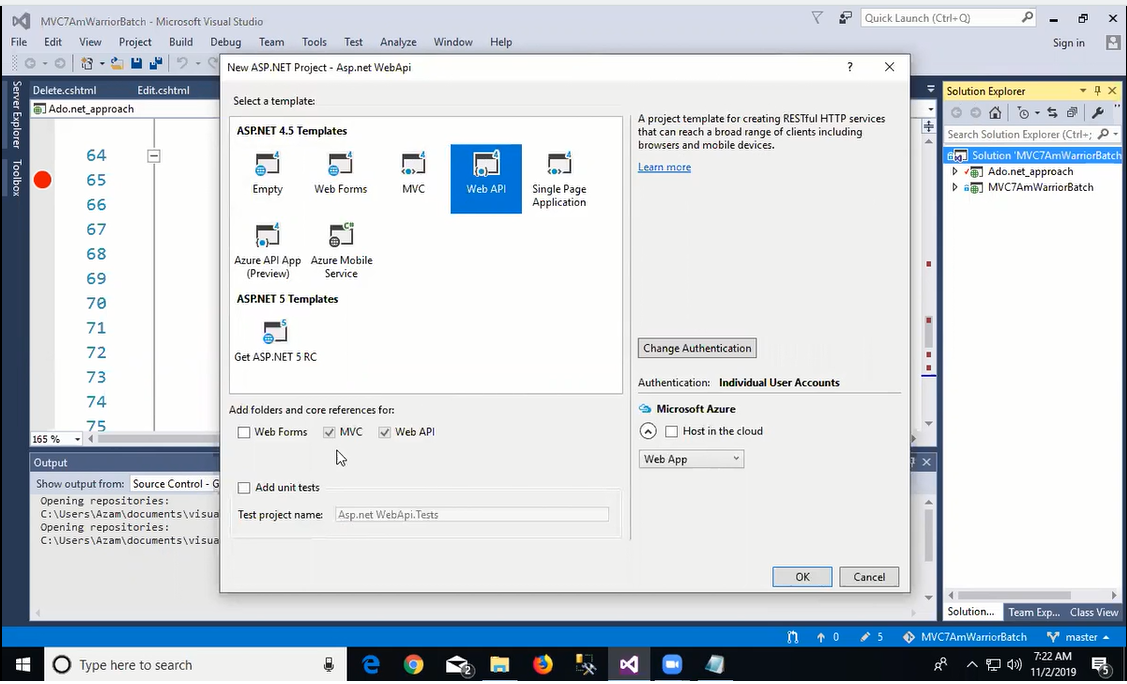
Right click on solution -> Add -> New Projects -> web -> ASP.NET Web Application -> Asp.net WebApi(Project name) -> ok. Then display one dialog box is shown below


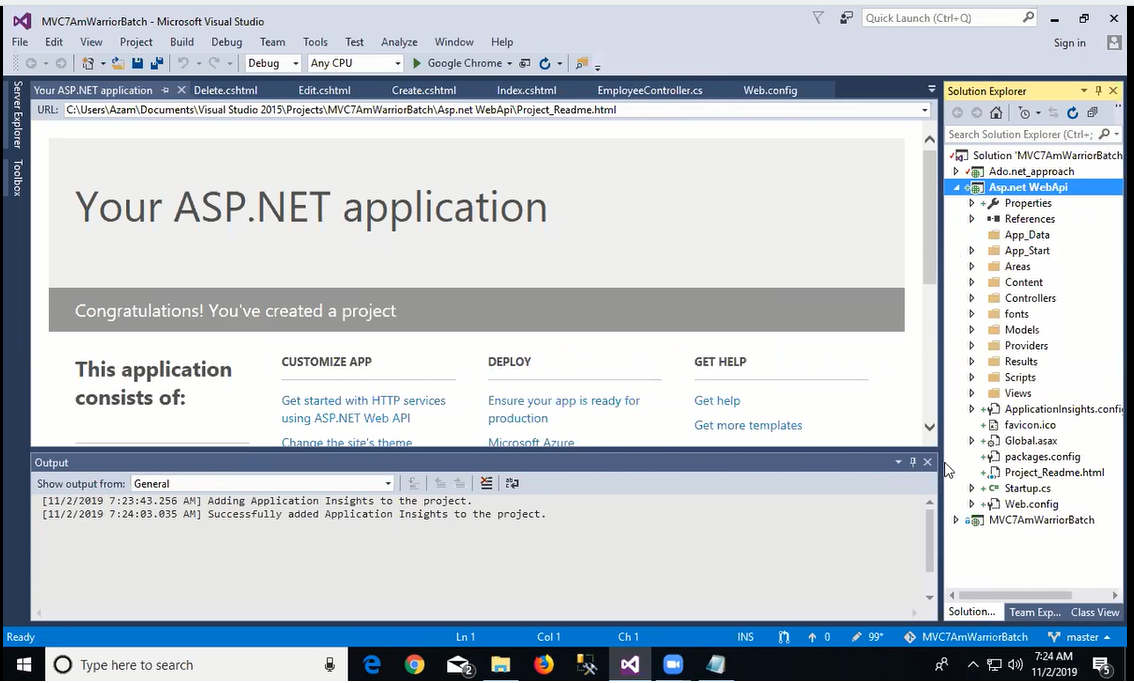
In above diagram we select Web API in Asp.Net 4.5 Template u click ok the project create like this:


Create Entity framework:

Right click on Models -> Add -> New Item after click new item its display one dialog box in that we select data under Visual C# then click ADO.NET Entity Data Model like below.


After give the name of entity model click add it will show one window like below


Click next button, after that new connection and enter your sql credential.

After that click Ok.
And then click next and select your table.

And then click finish button,


Build it once. after build the application we add one controller in controller folder.


After click the add button open dialog box below


Above dialog box select model class and data context class then click add button

In that EmployeeModelController.cs page we take first method (GetEmployeeModels). 

Now we create HTML file using ajax validation, now we go for HomeController.cs file write code like below

        public ActionResult GetApiAllData()
        {
            ViewBag.Title = "Home Page";

            return View();
        }


Add View for GetApiAllData method. copy below code in GetApiAllData.cshtml page 


    <table id="table-1">
        <thead>
            <tr>
                <th>
                    Employee Id
                </th>
                <th>
                    EmployeeName
                </th>
                <th>
                    EmployeeSalary
                </th>
                <th>
                    DeptId
                </th>
            </tr>
        </thead>
    </table>
<br />
<br />

<form>
   
    EmpName <input type="text" name="EmpName" id="EmpName" /><br />
    EmpSalary <input type="text" name="EmpSalary" id="EmpSalary" /><br />
    Deptid <input type="text" name="EmpDeptId" id="EmpDeptId" /><br />
    <p id="Save">Click me</p>

</form>
<script src="~/Scripts/jquery-1.10.2.min.js"></script>

<script>
        onload = function showdata() {
            $.ajax({
                url: "http://localhost:60497/api/EmployeeModels",
                type: "Get",
                datatype: "json",
                success: function (result) {

                    alert(result);
                    $.each(result, function (i, key) {


                        $("#table-1 tr:last").after('<tr><td>' + key.Empid + '</td><td>' + key.EmpName + '</td><td>' + key.EmpSalary + '</td></tr>' + '</td><td>' + key.DeptId + '</td></tr>');

                    });
                }
            });
        }


        $('#Save').click(function () {
            var url = "http://localhost:60497/api/EmployeeModels";
            var EmpName = $("#EmpName").val();
            var EmpSalary = $("#EmpSalary").val();
            var DeptId = $("#EmpDeptId").val();
            $.post(url, { EmpName: EmpName, EmpSalary: EmpSalary, DeptId: DeptId }, function (data) {
                $("#msg").html(data);
            });
        })
    </script>

Friday, November 1, 2019

Delete Operations in Asp.net mvc using Ado.net Approach and Diff between ViewData, ViewBag and TempData


To delete a record from database


Delete store procedure in Sql Server


USE [MvcApplicaion]

GO

SET ANSI_NULLS ON

GO

SET QUOTED_IDENTIFIER ON

GO

create PROCEDURE sp_DeleteEmployeeById

@EmpId int

AS

BEGIN

                    Delete From EmployeeModels where EmpId=@EmpId;

END


Now we go for the EmployeeContext.cs page and copy the below code


public int DeleteEmployeeDetailsById(int? id)

        {

            SqlCommand cmd = new SqlCommand("sp_DeleteEmployeeById", con);

            cmd.CommandType = CommandType.StoredProcedure;

            con.Open();

            cmd.Parameters.AddWithValue("@EmpId", id);

            object i = cmd.ExecuteNonQuery();

            int result = Convert.ToInt32(i);

            con.Close();

            return result;

        }    


 Now we go EmployeeController.cs page and copy the below code:


       public ActionResult Delete(int? id)

        {

            return View();

        }


        [HttpPost]

        [ActionName("Delete")]

        public ActionResult DeleteConform(int? id)

        {

            int i = db.DeleteEmployeeDetailsById(id);

            if (i > 0)

            {

                return RedirectToAction("index");

            }

            else

            {

                return View();

            }

        }


Add view For Delete Method in EmployeeController.cs Page then show one dialog box like below.


After click add code generate like below.


@model Asp.net_Approach.Models.EmployeeModel


@{

    ViewBag.Title = "Delete";

}


<h2>Delete</h2>


<h3>Are you sure you want to delete this?</h3>

<div>

    <h4>EmployeeModel</h4>

    <hr />

    <dl class="dl-horizontal">

        <dt>

            @Html.DisplayNameFor(model => model.EmpName)

        </dt>


        <dd>

            @Html.DisplayFor(model => model.EmpName)

        </dd>


        <dt>

            @Html.DisplayNameFor(model => model.EmpSalary)

        </dt>


        <dd>

            @Html.DisplayFor(model => model.EmpSalary)

        </dd>


    </dl>


    @using (Html.BeginForm()) {

        @Html.AntiForgeryToken()


        <div class="form-actions no-color">

            <input type="submit" value="Delete" class="btn btn-default" /> |

            @Html.ActionLink("Back to List", "Index")

        </div>

    }

</div>


After execute application when you call the get method it show like this:


After clicking the Delete link in above page it go delete conformation page


Clicking on Delete button calls the DeleteConform Action Method in EmployeeController.cs page above of the DeleteConform method one attribute [ActioName(“Delete”)] this method sends request to framework this particular record will be Deleted.


ViewData:

ViewData is a dictionary object that is derived from ViewDataDictionary class.

public ViewDataDictionary ViewData { get; set; }
ViewData is a property of Controller Base class.


ViewData is used to pass data from controller to corresponding view.

It’s life lies only during the current request.

If redirection occurs then it’s value becomes null.

It’s required typecasting for getting data and check for null values to avoid error.

Viewdata is used for transfering the data from controller to view for a corresponded or single request


Syntax:  

        Public ActionResult Index()

        {
                   Viewdata[“EmpDetails”]=”Supriya”;
         }

Example:  

 public ActionResult Index()
        {
            List<string> obj = new List<string>();
            obj.Add("pratiusha");
            obj.Add("deepti");
            obj.Add("Nagini");
            obj.Add("Anusha");
            ViewData["Student"] = obj;
            return View();
        }

<ul>
    @foreach (string item in ViewData["Student"] as List<string>)
    {

        <li>@item</li>
    }
</ul> 


ViewBage:

ViewBag is a dynamic property that takes advantage of the new dynamic features in C# 4.0.


Basically it is a wrapper around the ViewData and also used to pass data from controller to corresponding view.

public Object ViewBag { get; }
ViewBag is a property of ControllerBase class.


It’s life also lies only during the current request.

If redirection occurs then it’s value becomes null.

It doesn’t required typecasting for getting data.


Syntax: 

       Public ActionResult Index()

      {
                 ViewBag.EmpDetails =”Supriya”;
       }

we are creating model in model folder

  public class Employee
    {
        public int Empid { get; set; }
        public string EmpName { get; set; }

        public string Department { get; set; }
    }


--->
creating Controller

  public ActionResult Index()
        {
            Employee emp = new Employee();
            emp.Empid = 1;
            emp.EmpName = "prfatiusha";
            emp.Department = "IT";

            ViewBag.Details = emp;
            return View();
        }

under view

<ul>
   <li> @ViewBag.Details.Empid</li>
    <li> @ViewBag.Details.EmpName</li>
    <li> @ViewBag.Details.Department</li>
</ul>

or

@{
    ViewBag.Title = "Index";
    var myfellow = ViewBag.Details;
}

<h2>Index</h2>

<ul>
    <li> @myfellow.Empid</li>
    <li> @myfellow.EmpName</li>
    <li> @myfellow.Department</li>
</ul> 


TempData:

 TempData is a dictionary object that is derived from TempDataDictionary class and stored in short lives session.

public TempDataDictionary TempData { get; set; }
TempData is a property of ControllerBase class.


TempData is used to pass data from current request to subsequent request (means redirecting from one page to another).

It’s life is very short and lies only till the target view is fully loaded.

It’s required typecasting for getting data and check for null values to avoid error.

It is used to store only one time messages like error messages, validation messages. To persist data with TempData refer this article: Persisting Data with TempData

TempData:it is used to transfer the data from one  controller to another controller then you can use tempdata

Tempdata is also Tempdictionary object
Tempdata["key"]=value;

Tempdata is used to retain the values by two ways

1)keep method: it is used to retain the values which is present in tempdata
               return type is void

 Tempdata.keep();

2)peek method:
it is used for getting the object by using the key and will retain the values
by not allowing the key to be deleted
 Tempdata.peek("key");both accessing value and for retaing the value

public ActionResult Index()
        {
            TempData["Student"] = "Pratiusha";
            return RedirectToAction("About");
        }
        public ActionResult About()
        {
            var b = TempData.Peek("Student");
            var c = TempData.Peek("Student");
            ViewData["b"] = b;
            ViewData["c"] = c;
           
            return View();
        }