Monday, November 25, 2019

WCF Service in Asp.net MVC


WCF Service:

Windows Communication Foundation (WCF) is not a language, it’s not a technology and it is a framework for building service-oriented applications. So, if you want any service-oriented application you go with wcf services.

Here also you can send data and receive data from one point to another point. Are created multiple end point, and you host wcf service in multiple places like IIS, local, console application, windows services. 

The Main Advantage of using wcf supports more protocols like HTTP, TCP (Transmissions Control Protocol).

Wcf combative web application that instead of only one HTTP protocol for example if the customer is required the same service for web application as well as windows applications, for web application we can use HTTP protocol and for windows application we can use TCP protocol so, then we go for wcf service.

We will get the data XML format  and SOAP body (Simple object access Protocol) in wcf service also. 

 SOAP is a method of transferring messages, or small amounts of information, over the Internet. SOAP messages are formatted in XML and are typically sent using HTTP (hypertext transfer protocol).

The disadvantage of some more complicated in configure wcf service apart from that everything is good when we deal with wcf service.

We create wcf project will have 2 files,

1.       create interface

2.       create a class

what are the interface are there that called as a contract. that particular contract class need to implemented.

  • That means when you implement the wcf service the contract going to register between client and server. 
  • If you said that particular contract this method is there, if you have to be include that method. In case that method not included it’s get error. This is a stick policy of contract.
  • In here each and every web service weather accessing in Http weather accessing in Tcp they should be provide address. If don’t provide address the default which application are you working that address taken for us. 
  • To communication with your web services either we communicated by using Ajax call either by using class object it can create and access the services    
  • Here wcf service we can create services two ways 
1.       Restful service

2.       Service-oriented service
  • Wcf services also use for creating restful services
  • Restful service means each and every is versa access by using URI. So, that type of restful service we can even creating by using wcf.
  • Even test wcf service also there is lot of ways Svcutill.exe, postman, fiddler. 
  • Wcf service we have been using in windows application. Consuming encoded binary format (like 1 and 0’s)
  • Tcp protocol only converted encoded binary format.

Create WCF Service:

Right click on Solution Explore ->Add -> New Project -> ASP.NET Web Application (.NET Freamework) using C# -> Next -> Project Name (WcfApplication) -> Create -> select Empty and select MVC folder -> Create button like below


Right Click on Project -> Add -> New Item -> WCF Service -> Add 


Project added like below


Open IMyService1.cs file copy the below code in interface method

using System;

using System.Collections.Generic;

using System.Linq;

using System.Runtime.Serialization;

using System.ServiceModel;

using System.Text;


namespace WcfApplication

{

    // NOTE: You can use the "Rename" command on the "Refactor" menu to change the interface name "IMyService1" in both code and config file together.

    [ServiceContract]

    public interface IMyService1

    {

        [OperationContract]

        void DoWork();

        [OpertaionContract]

        int Add(int a, int b);

    }

}


Open MyService1.svc.cs file copy the below code


using System;

using System.Collections.Generic;

using System.Linq;

using System.Runtime.Serialization;

using System.ServiceModel;

using System.Text;


namespace WcfApplication

{

    // NOTE: You can use the "Rename" command on the "Refactor" menu to change the class name "MyService1" in code, svc and config file together.

    // NOTE: In order to launch WCF Test Client for testing this service, please select MyService1.svc or MyService1.svc.cs at the Solution Explorer and start debugging.

    public class MyService1 : IMyService1

    {

        public void DoWork()

        {

        }

        public int Add(int a, int b)

        {

            return a + b;

        }

    }

}

Run the Application (Right Click on MyService1.svc file -> click view in Browser option)


Test the wcf service:


Go to Run window type WcfTestClient.exe incase it not open go through the below paths copy that path in run Command prompt

VS 2019 Community:

C:\Program Files (x86)\Microsoft Visual Studio\2019\Community\Common7\IDE\WcfTestClient.exe

VS 2017 Community:

C:\Program Files (x86)\Microsoft Visual Studio\2017\Community\Common7\IDE\WcfTestClient.exe

The window open like below


In above window click on file -> Add service then window will be open then give path like below 


When u click ok button, it will show like below
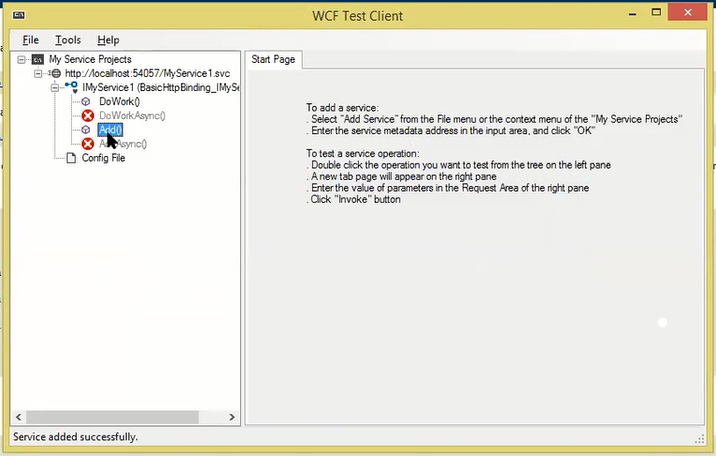


Click the Add method in lift side.


In the Request box, select the Value field and type numbers

.

Click the Invoke button. If a Security Warning dialog box appears, click OK. The result displays in the Response box.


Bindings in wcf services:

Basic binding:

This binding is provided by the BasicHttpBinding class. It is designed to expose a WCF service as an ASMX web service, so that old clients (that are still using an ASMX web service) can consume the new service. By default, it uses the HTTP protocol for transport and encodes the message in UTF-8 text format. You can also use HTTPS with this binding.

Web binding:


This binding is provided by the WebHttpBinding class. It is designed to expose WCF services as HTTP requests using HTTP-GET and HTTP-POST. It is used with REST based services that may provide output in XML or JSON format. This is very much used with social networks for implementing a syndication feed.


TCP binding:

This binding is provided by the NetTcpBinding class. It uses TCP protocol for communication between two machines within intranet (means same network). It encodes the message in binary format. This is a faster and more reliable binding compared to the HTTP protocol bindings. It is only used when the communication is WCF-to-WCF which means both client and service should have WCF.


Wednesday, November 20, 2019

Web Services in ASP.NET


Web Services:


A Web Service is a software service used to communicate between multiple devices on a network. More specifically, a Web service is a software application with a standardized way of proving interoperability between disparate applications. It does so over HTTP using technologies such as XML, SOAP, WSDL and UDDI

  •  Web service is a communication between the client and server applications on the World Wide Web.

  • Web Services is nothing, but it is one type of service we can be apply to the web application send through soap message. We are using web services through are hosted in IIS Server

  • Web service even other languages like java, php application can access the service created by .net this is advantage in web service.

  • Web service also one disadvantage Only use for Http protocol not for any other protocol and its only sending data by XML way.

  • XML also display by SOAP body


How to create Web Service:


Right click on WebApplication project -> Add -> New Item -> web -> Web Services -> Name (WebService1.asmx) -> Add


It generated like below


In WebService1.asmx.cs file, the code generated in it is the basic Hello World service. The default web service code behind file looks like the following:


using System;

using System.Collections.Generic;

using System.Linq;

using System.Web;

using System.Web.Services;


namespace WebApplication

{

    /// <summary>

    /// Summary description for WebService1

    /// </summary>

    [WebService(Namespace = "http://tempuri.org/")]

    [WebServiceBinding(ConformsTo = WsiProfiles.BasicProfile1_1)]

    [System.ComponentModel.ToolboxItem(false)]

    // To allow this Web Service to be called from script, using ASP.NET AJAX, uncomment the following line.

    // [System.Web.Script.Services.ScriptService]

    public class WebService1 : System.Web.Services.WebService

    {

        [WebMethod]

        public string HelloWorld()

        {

            return "Hello World";

        }

    }

}

WebMethod: it is nothing but to expose the webservice  

Then add one method like below: 

[WebMethod]

public int Addition(int a, int b)

{

    return a + b;

}

 If you want to Run the web service, Right click on WebService1.asmx -> click the View in Browse option


Then click on an Addition method link and check its runs properly or not.


Then click Invoke button, it’s get the XML permeate


Access Web service in Another application:

Go another project like NewWebApplication -> Right click on References -> Add Service Reference

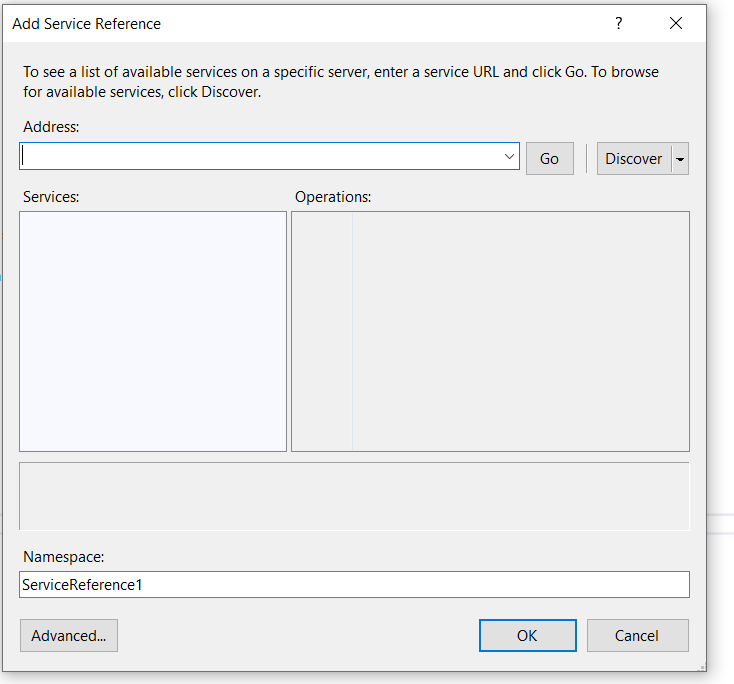
Now, after clicking on the Service Reference option, it will show the window given below.


Now click the Discover button.it will show the window given below


The web services added like below in ASP.NET MVC application


Add Controller in NewWebApplication project like HomeController.cs copy the below code in HomeController page


        public ActionResult GetAdditionResult()

        {

            ServiceReference1.WebService1SoapClient obj = new ServiceReference1.WebService1SoapClient();

            ViewBag.Result = obj.Addition(45, 25);

            return View();

        }

WebService1SoapClient is a web service class

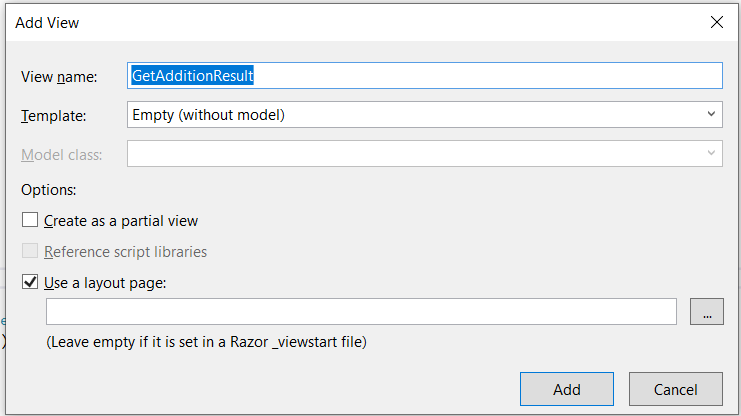
Add view for GetAdditionResult method


Click Add button then view is added

Then call the viewbage in view page

@ ViewBag.Result


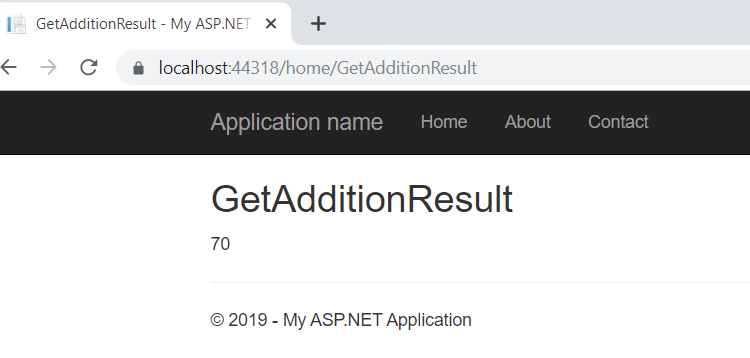
Then build the application the output comes like below:


Monday, November 18, 2019

Validations in ASP.NET MVC


Model Base validations:

ASP.NET MVC uses DataAnnotations attributes to implement validations. We can apply to the properties of model class. 

Validation we can perform in model class by using namespace called as System.ComponentModel.DataAnnotations. 

Required means value of the property must be provided


        [Required(ErrorMessage ="Please Enter Employee Name")]


        public string EmpName { get; set; }

Display: This attribute is used to display the property name.

        [Display(Name ="Employee Name")]

        public string EmpName { get; set; }

Compare: its means compare between password and conformPassword properties.

        public string Password { get; set; }

        [Compare("Password")]

        public string ConformPassword { get; set; }

DataType: This attribute specifies the type of the property like Email

        [DataType(DataType.EmailAddress,ErrorMessage ="InValid Email Address")]

        public string EmailId { get; set; }

Range: this validation we can use for specifies the min to max value for property.

        [Range(18,40,ErrorMessage ="Age should be between 18-40")] 

        public int Age { get; set; }

StringLength: this validation we can use how many numbers of characters are allowed for that particular property.

        [StringLength(10,ErrorMessage ="Address should be 10 char long")] 

        public string Address { get; set; }


Remote Attribute:
It is an attribute for validation in Data Annotation, which is used in model class validate the record instantly.

It is used to call sum ajax calls. If validation is true then display and if validation is false it’s display error message.
  

                  First parameter     Second parameter     Third parameter

[Remote("IsUserNameValid","EmployeeModel", ErrorMessage = "Employee Name Already Exists.")]
public string EmpName { get; set; }


First parameter is Action name.
Second parameter is a Controller name
Third parameter is Error message

In above Remote attribute validation line like below
IsUserNameValid:
This is the JsonResult method which checks the details from database and returns true or false.
EmployeeModel:
This is MVC Controller name and inside that, IsUserNameValid JsonResult method is defined to check the details from database.
ErrorMessage :
This is used to show the error message.


Right click on model folder -> Add -> Class -> name(EmployeeModel.cs) -> Add

using System;

using System.Collections.Generic;

using System.ComponentModel.DataAnnotations;

using System.Linq;

using System.Web;

namespace WebApplication.Models
{

    public class EmployeeModel

    {

        [Key]

        public int EmpId { get; set; }

        [Required(ErrorMessage ="Please Enter Employee Name")]

        [Display(Name ="Employee Name")]


        [Remote("IsUserNameValid","EmployeeModel", ErrorMessage = "Employee Name Already Exists.")]

        public string EmpName { get; set; }

        [Required(ErrorMessage = "Please Enter Password")]

        public string Password { get; set; }

        [Compare("Password")]

        public string ConformPassword { get; set; }

        [DataType(DataType.EmailAddress,ErrorMessage ="InValid Email Address")]

        public string EmailId { get; set; }

        [Range(18,40,ErrorMessage ="Age should be between 18-40")] 

        public int Age { get; set; }

        [StringLength(10,ErrorMessage ="Address should be 10 char long")] 

        public string Address { get; set; }

    }

}

when you apply validation in model it will display in View page.

Right click on controller-> Add -> Controller -> Name (EmployeeController.cs) page -> Add

        public ActionResult Validations()

        {
            return View();
        }

        public JsonResult IsUserNameValid(string EmpName)
        {
            if(EmpName == "supriya")
            {
                return Json(false, JsonRequestBehavior.AllowGet);
            }
            else
            {
                return Json(true, JsonRequestBehavior.AllowGet);
            }
        }

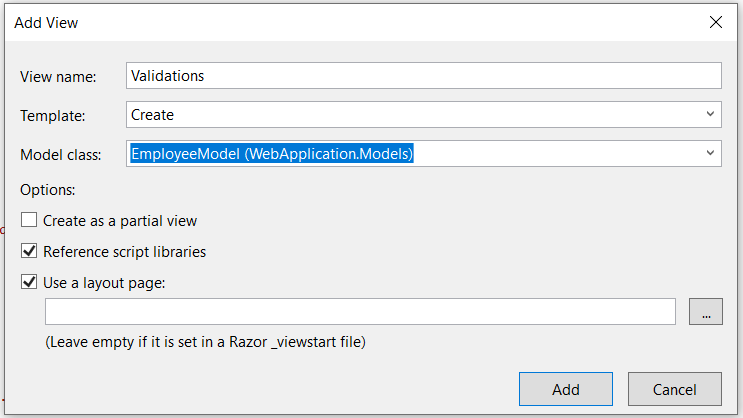
Right click on Validations method in Controller -> Add View


Select like above and click Add button. Its created Validations.cshtml page like below


@model WebApplication.Models.EmployeeModel

@{

    ViewBag.Title = "Validations";

}

<h2>Validations</h2>

@using (Html.BeginForm())

{

    @Html.AntiForgeryToken()    

    <div class="form-horizontal">

        <h4>EmployeeModel</h4>

        <hr />

        @Html.ValidationSummary(true, "", new { @class = "text-danger" })

        <div class="form-group">

            @Html.LabelFor(model => model.EmpName, htmlAttributes: new { @class = "control-label col-md-2" })

            <div class="col-md-10">

                @Html.EditorFor(model => model.EmpName, new { htmlAttributes = new { @class = "form-control" } })

                @Html.ValidationMessageFor(model => model.EmpName, "", new { @class = "text-danger" })

            </div>

        </div>
        <div class="form-group">

            @Html.LabelFor(model => model.Password, htmlAttributes: new { @class = "control-label col-md-2" })

            <div class="col-md-10">

                @Html.EditorFor(model => model.Password, new { htmlAttributes = new { @class = "form-control" } })

                @Html.ValidationMessageFor(model => model.Password, "", new { @class = "text-danger" })

            </div>

        </div>
        <div class="form-group">

            @Html.LabelFor(model => model.ConformPassword, htmlAttributes: new { @class = "control-label col-md-2" })

            <div class="col-md-10">

                @Html.EditorFor(model => model.ConformPassword, new { htmlAttributes = new { @class = "form-control" } })

                @Html.ValidationMessageFor(model => model.ConformPassword, "", new { @class = "text-danger" })

            </div>

        </div>

        <div class="form-group">

            @Html.LabelFor(model => model.EmailId, htmlAttributes: new { @class = "control-label col-md-2" })

            <div class="col-md-10">

                @Html.EditorFor(model => model.EmailId, new { htmlAttributes = new { @class = "form-control" } })

                @Html.ValidationMessageFor(model => model.EmailId, "", new { @class = "text-danger" })

            </div>

        </div>

        <div class="form-group">

            @Html.LabelFor(model => model.Age, htmlAttributes: new { @class = "control-label col-md-2" })

            <div class="col-md-10">

                @Html.EditorFor(model => model.Age, new { htmlAttributes = new { @class = "form-control" } })

                @Html.ValidationMessageFor(model => model.Age, "", new { @class = "text-danger" })

            </div>

        </div>

        <div class="form-group">

            @Html.LabelFor(model => model.Address, htmlAttributes: new { @class = "control-label col-md-2" })

            <div class="col-md-10">

                @Html.EditorFor(model => model.Address, new { htmlAttributes = new { @class = "form-control" } })

                @Html.ValidationMessageFor(model => model.Address, "", new { @class = "text-danger" })

            </div>

        </div>

        <div class="form-group">

            <div class="col-md-offset-2 col-md-10">

                <input type="submit" value="Create" class="btn btn-default" />

            </div>

        </div>

    </div>

}

<div>

    @Html.ActionLink("Back to List", "Index")

</div>

@section Scripts {

    @Scripts.Render("~/bundles/jqueryval")

}

when you build the application the output shown like below

Incase the validationsummary its give false, it's shows all required validation in above the fields like below
@Html.ValidationSummary(false, "", new { @class = "text-danger" }

AntiForgeryToken: it’s created a hidden key for form, that is valid till the form is submitted. Very time its create new key for form.

EditorFor: it is Html helper class to create a control base of the particular model

ValidationSummary to display all the error messages in the view.

ValidationMessageFor helper method to display field level error messages in the view.


Scaffolding Column:

It is used to hide property in UI, if it is EditorForModel and DisplayForModel.


First, we create method in HomeController.cs page like below:

public ActionResult Disply()

        {

            return View();

        }

Add view for display method and copy below code

@model WebApplication.Models.EmployeeModel

@{

    ViewBag.Title = "Disply";

}


<h2>Disply</h2>


@using (Html.BeginForm())

{

    @Html.AntiForgeryToken()


}

<div>

    @Html.ActionLink("Back to List", "Index")

</div>


When you run the application, it shows output like below:

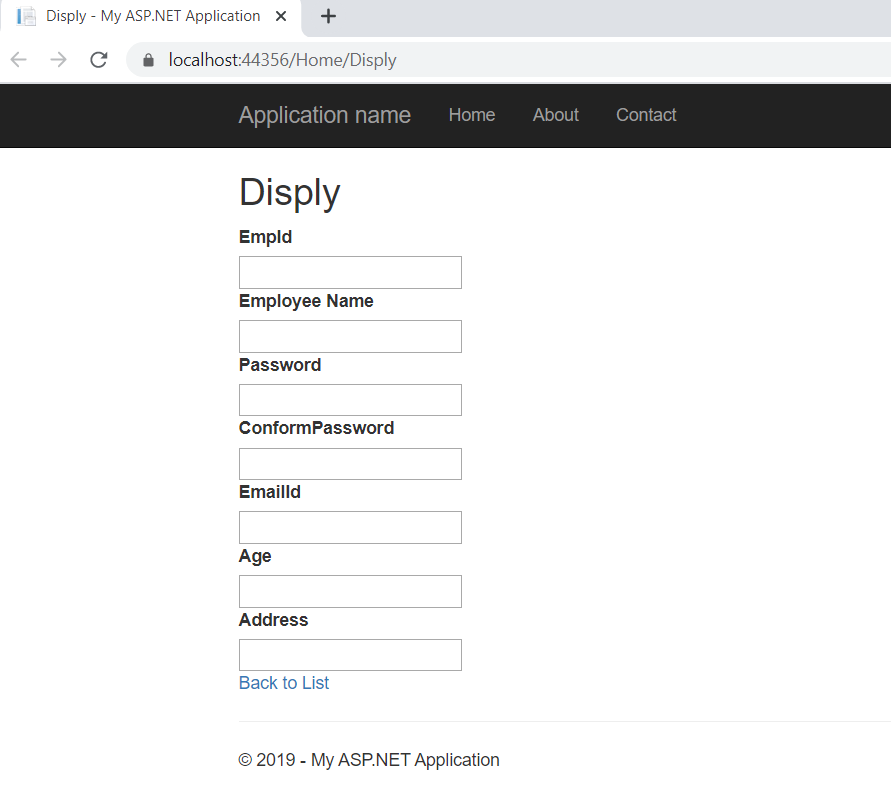
Add below code in beginform method in display view
@using (Html.BeginForm())
{
    @Html.AntiForgeryToken()
    @Html.EditorForModel("EmployeeModel")
}


In above screen I don’t want to display EmpId so, we go and change in EmployeeModel.cs page


In EmployeeModel.cs page I don’t want to delete EmpId but, I want to hide things in model class.

[ScaffoldColumn(false)]

public int EmpId { get; set; }